

Results 11 to 20 of 37
-
10-02-2011, 02:55 PM #11Executive Assistant


- Join Date
- Jul 2007
- Location
- North,East England
- Posts
- 1,447
Re: Improving Visuals (4 computers, 3 projectors, curved screen)
Simply Brilliant! Keep us updated on this one. Thanks for lots of pics too

-
10-03-2011, 08:50 AM #1275+ Posting Member

- Join Date
- Nov 2010
- Location
- Spain
- Posts
- 101
Re: Improving Visuals (4 computers, 3 projectors, curved screen)
You're welcome!
Today I've got my three Immersive Display Lite 2 licences (one per wideview client PC) and I found the circular laser level! So warping and blending the screen may be done in a few days.Greetings!
Aaron Sanchez - http://mi737.blogspot.com
-
10-05-2011, 09:08 AM #1375+ Posting Member
- Join Date
- Nov 2010
- Location
- Spain
- Posts
- 101
Re: Improving Visuals (4 computers, 3 projectors, curved screen)
Hi guys!
After a very very hard research in every hardware store here, we can only found ONE circular laser level to warp the screen (At least its not very expensive (110))
The head piece spins at X rpm (depends of a potentiometer) and makes the line.

The alignment for warping its not difficult, but its very odd. Much better with two people involve, but I was alone this time.

You need to align the yellow boxes of every projector (so you need to do it in the three pc's) and sometimes the laser was unable to go till the end of the screen because the cockpit itself, so you need to move the tripod, level again, etc.

You should begins with just four points (the four corners) warp those points, then add one more point, warp all the points again (the previous warped points may move) and so on.
I was warping for a couple of hours, and I need to spent a little more time to finish the warping (I leave the highest points unwarped). But I want to see the progress!

Warping not complete, not worked either on blending, and wideview just in default left side-front-right side, but the "thing" is going on!
The clouds seems to be perfectly aligned as I expect (althougt the wideview its not adjusted in any case)
I will upload a video as soon as the warping and blending was over.Greetings!
Aaron Sanchez - http://mi737.blogspot.com
-
Post Thanks / Like - 1 Thanks, 0 Likes, 0 Dislikes
 gandofalcon thanked for this post
-
10-09-2011, 05:38 AM #14New Member
- Join Date
- Oct 2011
- Location
- Spain
- Posts
- 1
Re: Improving Visuals (4 computers, 3 projectors, curved screen)
Just aowsome!!! That should be a really inmersive experience. Blending the three projections may not be too difficult, but sure it takes a little bit more work than you may expect. Congratulations for your work, please keep uploading photos of the final results
-
10-09-2011, 06:53 AM #15300+ Forum Addict
- Join Date
- Feb 2006
- Location
- N/A
- Posts
- 458
Re: Improving Visuals (4 computers, 3 projectors, curved screen)
Great setup you got going Aaron!
Maybe, I missed it, but did you say how you plan to progress with the screen? I see the MDF(fiber) board being used for your screen and it appears to be multiple sheets laid horizontal. How do you plan to work with the seams or do you plan to add a screen fabric over this?
The reason I ask is for this:
My screen is done the same way and it is 9 feet high by 36 feet (curved), and we had the same problem with the seams. We tried wood filler and that cracked and looked bad. We then covered the entire screen in another layer of the MDF sheets.
Now, we have two layers of sheets or about 18 sheets (9 per layer). YES! A lot of wood, plus we have a backside layer. Then, we tried drywall compound and that was good at first, but the exspansion and contraction issues caused hairline cracks to form and then they got a little bigger...
Funny, we even tried using plastic sheets (9 sheets of 4 x 8 feet) before all this and the seam issues were just as bad then; okay, it's not so bad now. However, in the end, I wish I had just ordered the screen material. What's more funny is this; we got a 101 inch fixed projection screen for our home entertainment room and the screen material look simple enough, but it looked awesome when the projector was shown on it.
Therefore, it made the idea of getting screen material for the Sim's curved screen a solid idea... Problem is finding a company that will make it on such a big scale and not charge too much money, but that is not easy to do. Some want $2000-$5000 US to even consider it!
Finally, do post how you solve(d) this minor, but important issue. Thanks for posting your work progress and the photos.
BSD
-
10-10-2011, 04:49 AM #16500+ This must be a daytime job

- Join Date
- Jun 2009
- Location
- Athens
- Posts
- 720
Re: Improving Visuals (4 computers, 3 projectors, curved screen)
That's a great project Aaron !!!
Thanks for the info
-
10-10-2011, 09:04 AM #1775+ Posting Member
- Join Date
- Nov 2010
- Location
- Spain
- Posts
- 101
Re: Improving Visuals (4 computers, 3 projectors, curved screen)
Hi blueskydriver.
Yes you are right, I didnt say anything about the construction material, basically because the "wood artist" its my friend Orlando and also because Im not able to write in english about those materials names (in fact, I do not know its names in spanish haha) but I will try to explain what I know.
By now, the screen is just what is show in the pics, those sheets screwed to the vertical stick? (the piece of wood from floor to ceiling) Originally Posted by blueskydriver

The screen was made using MDF panels (7 pieces of 1.2m x 2.4m (4x8 feet)) 5mm thick, so we have three vertical and one horizontal joins. With the horizontal seams, we work with staples (from behind, just for avoid future separation joins, and taking care with staples size to not traspasing the wood) and glue adhesive for wood (the glue is to prevent the MDF to go inner or outer of his parallel)
The vertical was more problematic, we use wood filler too, but we tested three or four different brands (with diferents time of dried). We covered every screw hole and the seams. Our major problem was the different curved ratio which appears in the sheet joins, which its more planar next to the borders. We wasted three wood filler (1kg every one) to fullfill the seams and compensate this "more planar" surface.
sheetjoins.jpg
We use the wood filler (I assume thats the name) to cover the (dashed in the picture) area, to mantaing the screen curve.
After this, we sand the whole screen several times, and finally painted. The result its far to be perfect, but after painted, you cannot see the little imperfections. Off course, here in Canary island we have 21º over the year (from 18º in winter to 24 in summer) so I think cracking due to temp and humidity variation may not affect us here.
I will get you more information about the paint we use (we painted the screen in grey) as soon as I get the info.
This weekend we've installed another layer of sheets (blackpainted) over and under the effective screen, and also painted the ceiling in blackmate to increase the feel of contrast and to avoid light reflections.
We were looking for another materials too, but as soon as we warped the screen to test the projection, and see how little noticiable they are, we pass to another step in our building. Originally Posted by blueskydriver
Greetings!
Aaron Sanchez - http://mi737.blogspot.com
-
Post Thanks / Like - 2 Thanks, 0 Likes, 0 Dislikes
-
10-10-2011, 09:11 AM #1875+ Posting Member
- Join Date
- Nov 2010
- Location
- Spain
- Posts
- 101
Re: Improving Visuals (4 computers, 3 projectors, curved screen)
Thanks Sherezado and Nick!
Its a hard work, but when you look to the right and the left, and see how you leave the ground... thats priceless!Greetings!
Aaron Sanchez - http://mi737.blogspot.com
-
10-10-2011, 05:07 PM #1975+ Posting Member
- Join Date
- Nov 2010
- Location
- Spain
- Posts
- 101
Re: Improving Visuals (4 computers, 3 projectors, curved screen)
Lot of work this weekend:
First: Cover the screen and the cockpit to paint the ceiling in mate black.

Then we add another layer of MDF sheets already painted in black just below and over the used screen

When the screen was more or less finished, I take the first step blending the projection: Here a little approach:
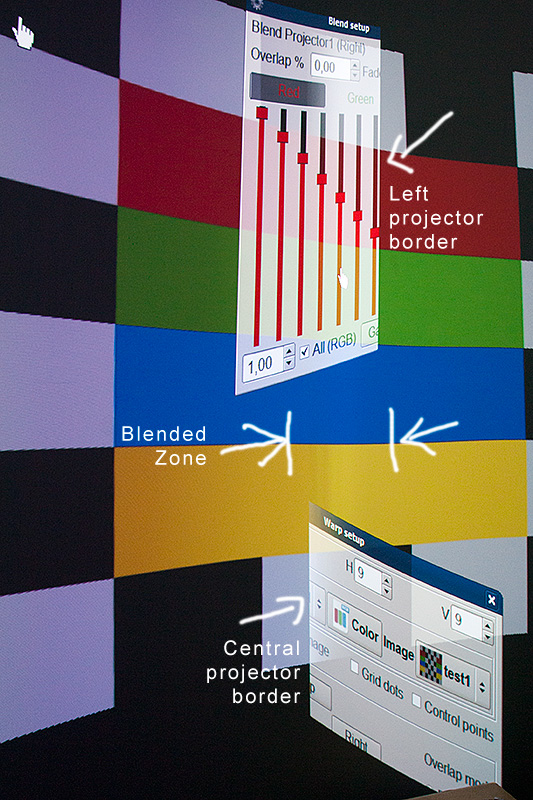
After a quick setup, not worked too much on right blending and alignment. The left one was more accurate as you can see

You can see where the blend starts if looks at the typical red text (sound off in this case) on top right every projector. Hard work with wideview, choosing differents angles, points of view, and zoom to give your final FOV and position. Very much test and try. You can also see the perfect syncronization that wideview do in the clouds, tested in all condition and worked flawlessly (even rain, snow, fog, etc.)Greetings!
Aaron Sanchez - http://mi737.blogspot.com
-
10-10-2011, 05:10 PM #20Executive Vice President, MyCockpit


- Join Date
- Oct 2005
- Location
- Ocala, FL USA
- Posts
- 2,884
Re: Improving Visuals (4 computers, 3 projectors, curved screen)
WOW!!!! Looks FANTASTIC!!!!!!

Matt Olieman

 Reply With Quote


Candid connections: Platform for casual relationships Live Women Prime Сasual Dating
Super Сasual Dating - Genuine...