

Results 11 to 20 of 21
Thread: 1979 Mooney M20J - Phase 1
-
01-30-2009, 01:53 PM #11Executive Assistant


- Join Date
- Jul 2007
- Location
- North,East England
- Posts
- 1,445
Hi David (Great to see you back by the way!
 ) ... If you don't want the plexi and are going with MDF let me know because i need to get some plexi in the coming months to make some panels with, we might be able to come to an offer on it.
-
01-30-2009, 01:54 PM #1275+ Posting Member

- Join Date
- May 2008
- Location
- St Louis, MO, USA
- Posts
- 146
You can also use an adjustable hole saw like the pic below to cut round holes in acrylic. I cut some 2.8" holes in acrylic last night for the instruments I am building. I used the slowest speed on my drill press (720RPM I think) and fed slowly. Lubrication helps a lot, I used a little bit of a 4:1 water/dish soap mix. Originally Posted by Michael Carter


(not mine, found on Google)
I used the same hole saw to cut circles in 0.064" aluminum sheet but it makes a LOT of noise and you have to go real slow.
-
Post Thanks / Like - 1 Thanks, 0 Likes, 0 Dislikes
 David Rogers thanked for this post
-
01-30-2009, 02:45 PM #13300+ Forum Addict

- Join Date
- Mar 2008
- Location
- Kamloops, British Columbia
- Posts
- 423
I've built a generic pit and have a few different aircraft that I fly, the Carenado Mooney is one of them. I used the guages that came with the aircraft to build the panels, have you considered using those instead of the PM guages? I've attached a picture of my pit setup with the Mooney guages.
2847063131_567eaaf419_b.jpg
-
Post Thanks / Like - 2 Thanks, 0 Likes, 0 Dislikes
-
01-30-2009, 03:20 PM #14300+ Forum Addict

- Join Date
- Sep 2007
- Location
- Durham (The original!), England
- Posts
- 332
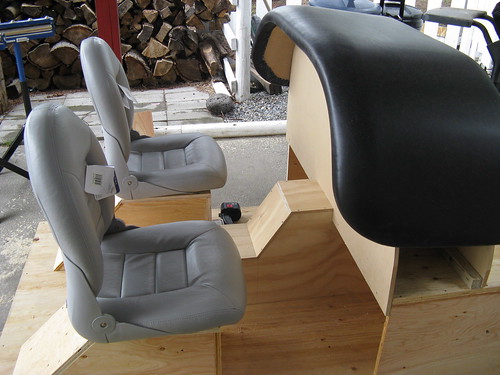
Shawn, your panel surround looks amazing ! ....... that is exactly what I would love to have - The leather glareshield part at the top looks fantastic
- where did you get the material for that ?
Thanks for the pics William
I have basically decided that if I can pick up a Hole saw for pretty cheap tomorrow, I will stick with the Plexi - if not, I will switch to MDF as I can cut that with the existing tools I have.
Thanks again for all the help and advice!
PS. Hey Gez how's it going. You can buy Plexi in various sizes and thicknesses from a place in the UK on eBay. I payed £12 inc postage for a 3mm board that is 1500mm x 500mm is size. :0)David R
Durham, England
1979 Mooney M20J Cockpit builder ......
-
01-30-2009, 03:37 PM #15300+ Forum Addict
- Join Date
- Mar 2008
- Location
- Kamloops, British Columbia
- Posts
- 423
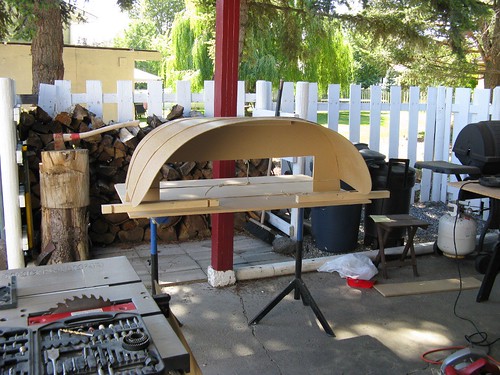
Thanks David. The glaresheild was built with blue foam insulation glued onto hardboard and then shaped with a file and sandpaper. The covering is fake leather. If you go that route make sure you buy vinyl that stretches both ways. I made that mistake and bought a material that only stretched in one direction and couldn't get it to fit wrinkle free. I posted a few pictures in the forums when I was building the glarsheild, when I get back to a computer I'll look for it and post a link, I'm on my Blackberry at the moment.
I forgot the thread I posted the pictures in was in the cockpit update section so it's been deleted. So I've attached the photos to this post.

Last edited by Shawn; 01-30-2009 at 05:58 PM. Reason: Added photos
-
Post Thanks / Like - 3 Thanks, 0 Likes, 0 Dislikes
-
01-31-2009, 07:49 AM #161000+ Poster - Fantastic Contributor
- Join Date
- Nov 2008
- Location
- Europe
- Posts
- 1,931
Hi shawn, is your glareshield made from bendy MDF or Hardboard to create the curve? And how do you manage to bend the styrofoam, did you use 'slits' to create the bend or did you use 'sections' as i see you have slits at the front from your picture, and did you staple the fake leather to the wood or glue it? As this is my next project, ive thought of a few ways of making a glare shield, but this way seems to be most effective than a £200 simkit glareshield.
Cheers
_______________________
Alex
AlexPilot2008
-
01-31-2009, 10:22 AM #17300+ Forum Addict
- Join Date
- Sep 2007
- Location
- Durham (The original!), England
- Posts
- 332
Shawn, your pit is just the business... I'm so envious! ....... your layout and approach is exactly what I want to achieve in a GA pit.

One last question for you for now;
I know you said you use the actual panels from the add-ons you fly (ie... like the Mooney), do you use 3 monitors coming from 1 PC ? .... (one for the outside view, 1 for the left side panel of the pit, and 1 for the right ?).
Cheers,David R
Durham, England
1979 Mooney M20J Cockpit builder ......
-
01-31-2009, 01:12 PM #18300+ Forum Addict
- Join Date
- Mar 2008
- Location
- Kamloops, British Columbia
- Posts
- 423
The bottom of the glareshield (what the blue foam is glued to) is hardboard. The first pictures shows the hardboard tied onto the panel in an attempt to soften it a bit. Eventually I cut 3/4" plywood frames to screw the hardboard to, you can see those in the second picture. The blue foam is a single peice that was cut 85% of the way through in the areas that needed to be bent, it was then glued to the hardboard with a spray on epoxy. The faux leather is both glued and stapled, make sure you invite a few friends over to help with this part, it takes a few sets of hands to pull out all the wrinkles. I am currently using 6 monitors from a single PC, three are connected to a Triplehead2Go for the forward view, one displays the 90 degree right view, and two display the guages. It's a very high end computer (in fs9 I rarely drop below 100 fps) but in hindsight I should have used two cheaper computers and Wideview for the displays. That way I could have both a right and left window and some additional monitors for things like a GPS.
-
01-31-2009, 01:18 PM #1925+ Posting Member

- Join Date
- Nov 2005
- Location
- Sotra. Norway
- Posts
- 64

Nice to see a GA project every now and then. In fact to seldom.
-
02-08-2009, 06:26 AM #20150+ Forum Groupie


- Join Date
- Jun 2008
- Location
- South West, Western Australia
- Posts
- 245
Great looking project of a great little plane. I love the glareshield covering!!
."Tony"
In memory of Flt Lt Tony Hill who, on 5 December 1941, at the request of Doctor R V Jones, successfully photographed a small "Würzburg radar" at Bruneval on the French coast. This from a height of only 200 ft, at high speed, under fire and from a camera mounted obliquely behind the cockpit.

 Reply With Quote
Similar Threads
-
Mooney Bravo panel.
By Doon1 in forum My Cockpit UpdateReplies: 3Last Post: 03-07-2011, 12:52 PM -
Second build. Mooney Bravo
By Doon1 in forum General Aviation (GA) Builder DisccusionReplies: 0Last Post: 05-03-2010, 12:03 PM -
How about this 3 phase gearboxed motor?
By metalnwood in forum Cockpit Parts and Motion PlatformsReplies: 1Last Post: 03-22-2009, 08:09 PM -
Phase 1 737NG complete
By David Rogers in forum My Cockpit UpdateReplies: 9Last Post: 11-27-2007, 11:22 PM


Hi...realize this has been a long time, but I'm heading down the path of building my own 777...
B777 Overhead Panel Design