

Results 1 to 10 of 20
Thread: Saitek TPM teardown...
-
08-06-2011, 01:58 PM #1150+ Forum Groupie

- Join Date
- Apr 2008
- Location
- Graham, WA
- Posts
- 296
Saitek TPM teardown...
All the reviews I see on flight control hardware goes on and on about how the product is used and they don't tell you squat about what the guts look like on the inside. For cockpit builders as a group, a product hackability is more important than just about any other feature.
When I got my Saitek TPM module (Throttle/Pitch/Mixture) in, the first thing I did after I tested it was to tear it apart.
Remember kids, warranties are there to be voided and screws are there to be removed!
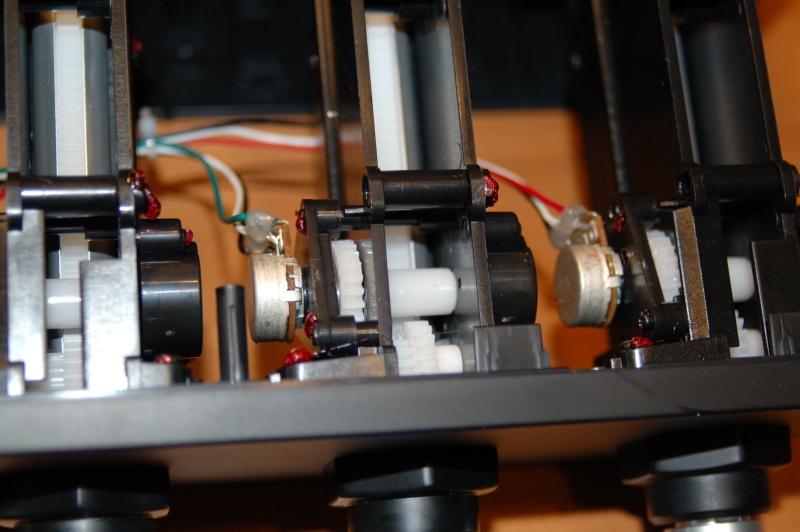
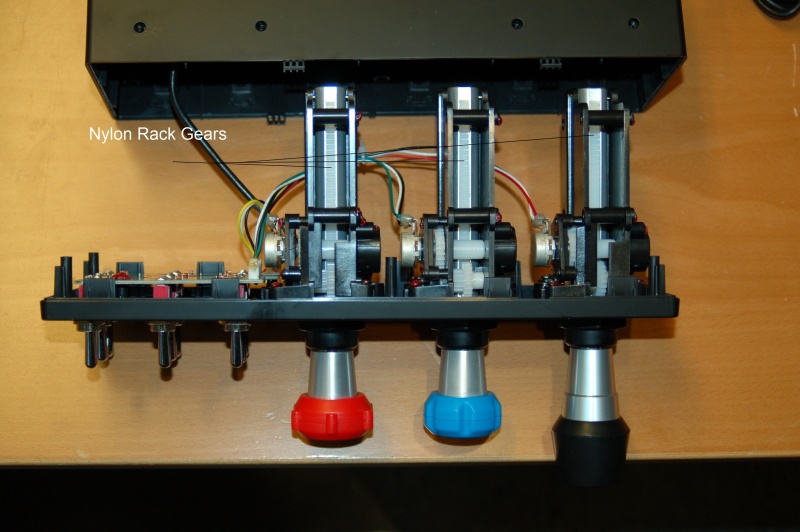
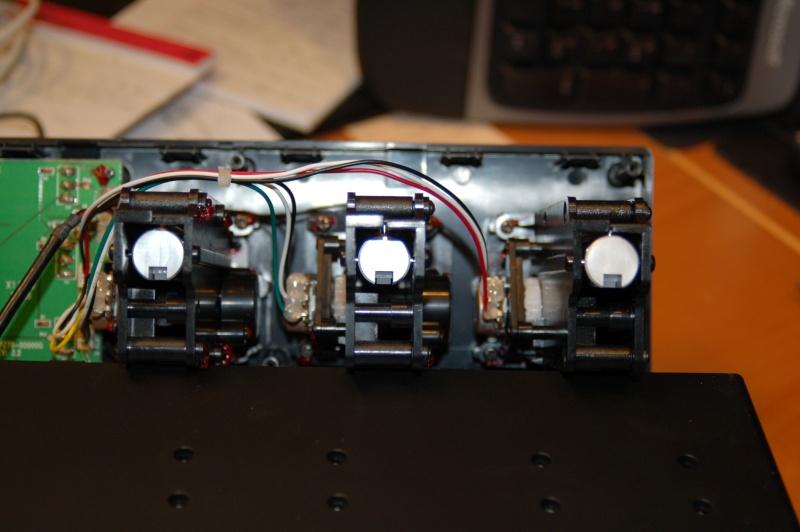
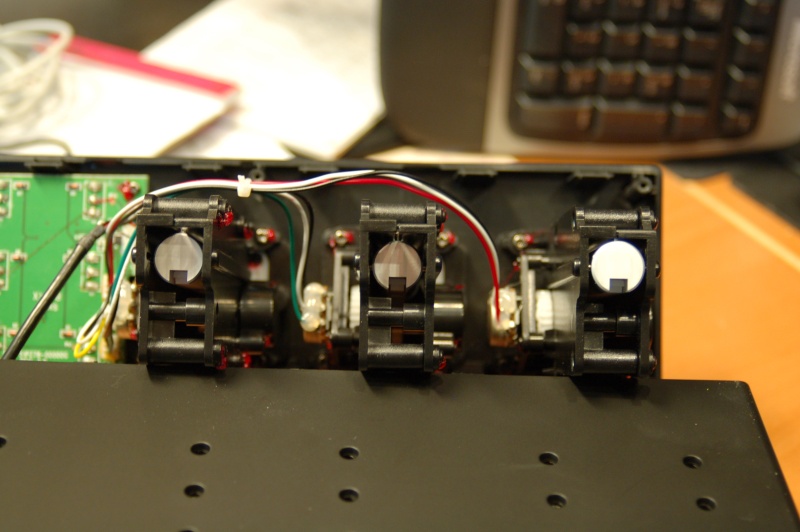
The individual linear controls are made from extruded aluminum bar. They have a 1/8" or so channel machined along their length were a rack gear is installed. This rack engages a shaft that both connects to the "regulator" mechanism as well as to the potentiometer that provides the actual input. There's a pin set in the aft end of the control rod that limits its forward travel (about 3").
The "regulator" is a device that limits the rate at which the control can be manipulated - it's very similar in design to the higher quality CD & tape deck door mechs that limit the speed at which the door opens. This provides a non-adjustable, realistic force to the linear controls - the only thing that would improve these is if they were true turnable vernier controls like you'd find in the real aircraft.
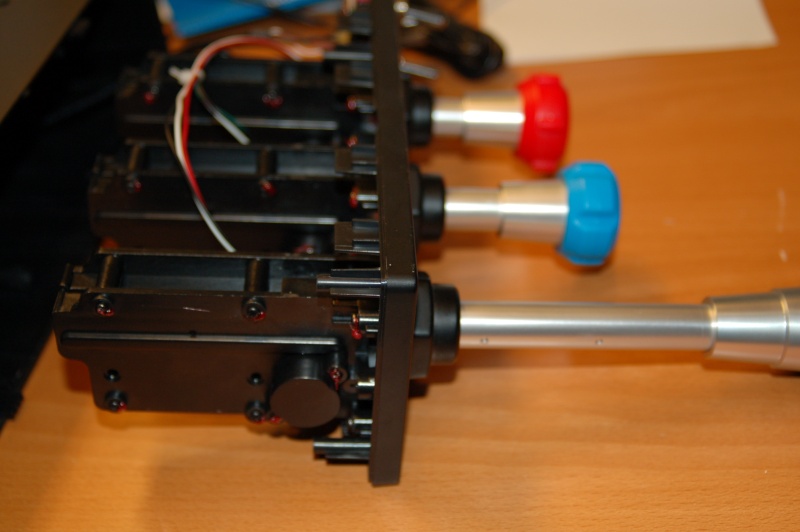
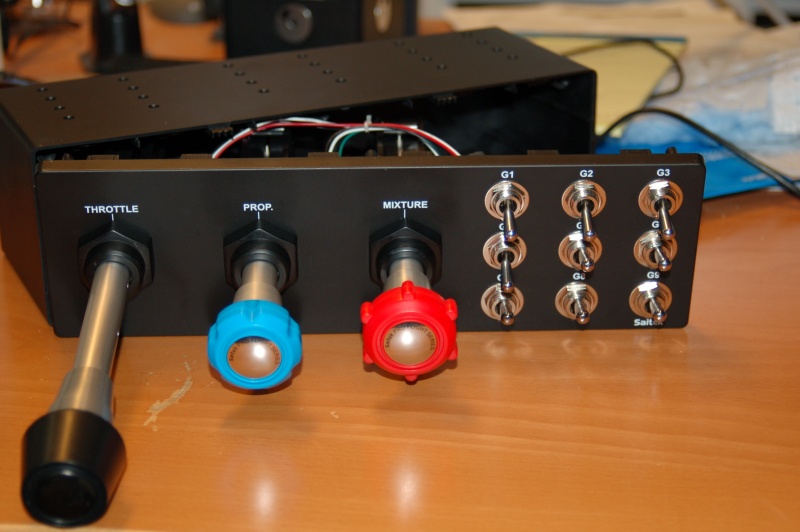
The knobs are plastic, but don't "ring hollow" - they're very solid feeling. The bulkhead mounting nuts are just there for show - they're cast into the body shell of the TPM module itself. This to be expected and presents a cost saving measure. I may mask & paint mine with some silver or chrome paint to improve the look.
The linear mechanisms are self-contained units that attach to the front body shell of the TPM with a few screws. This lends them to being pulled and mounted in a different chassis. Good call on Saitek's part I think. While pots are used, they're three wire devices which makes them voltage dividers and more accurate than the old two-wire "timed decay" method used in cheaper devices. Because of the actual duty cycle these are expected to deal with, a pot is a perfectly acceptable choice - they won't experience the wear that a rudder pedal or flight stick mechanism will. The gear trains are well (but not over) lubricated - this will help prevent excessive wear on the gears - which are all nylon and not ABS as I'd originally suspected.
The interesting thing I noted about the way it was designed is that it appeared that the engineer responsible knew that someone was going to want to tear it down - There are no sonic welded or glued parts that I could see - it's possible to completely disassemble the whole TPM just by removing screws or removing pins (you'll have to carefully drift the pins out, but it's possible). This means that as long as Saitek is willing to provide parts, you'll be able to repair any issue found with the unit.
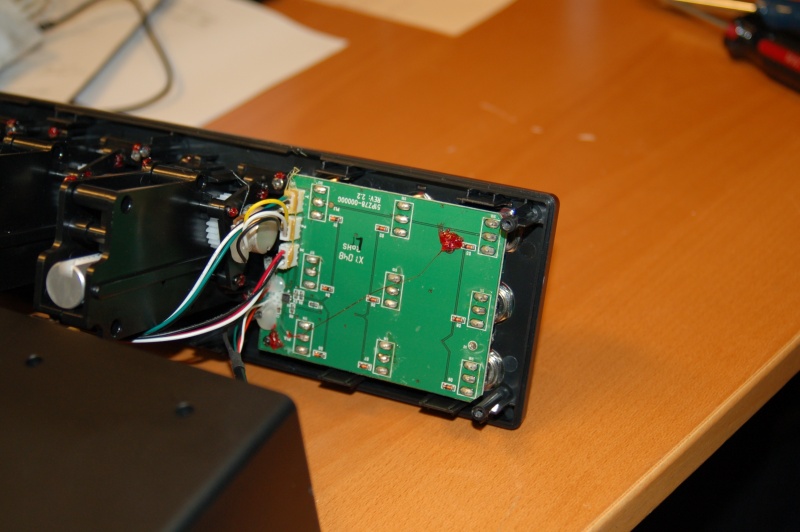
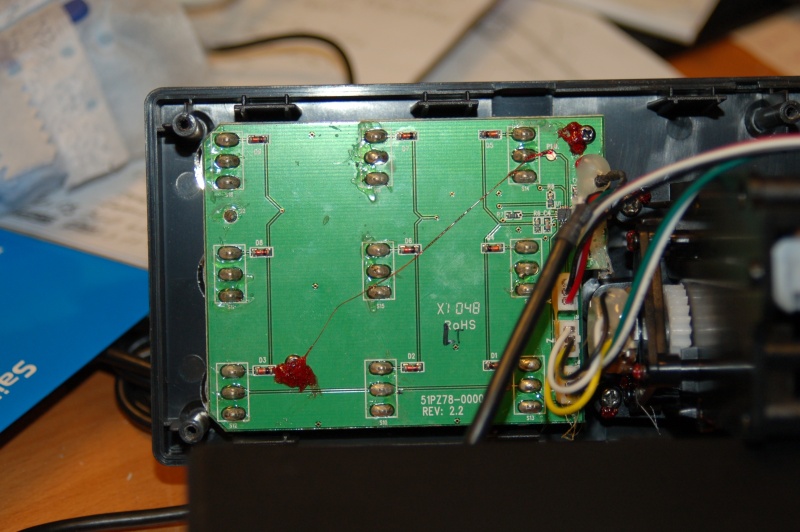
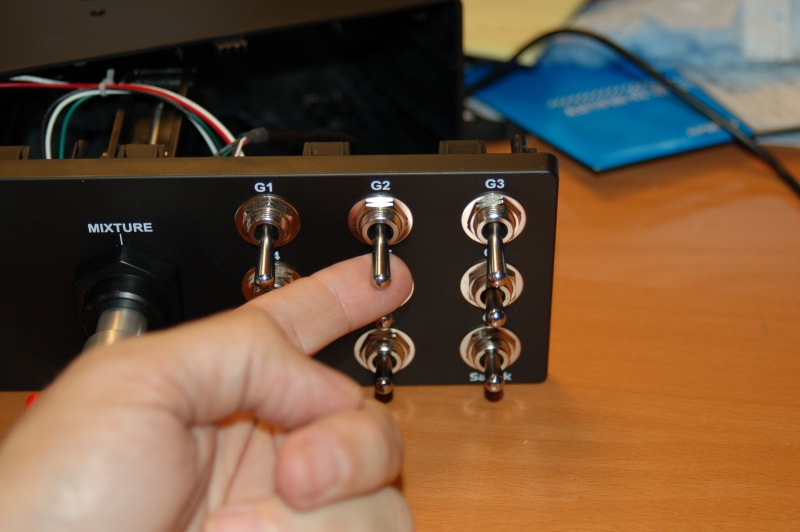
The only problem I found with the TPM is the 9 switches that it has. The vertical spacing is ok, but the horizontal spacing is way too close. Well if you're over 8 years old anyway.
The switches are mounted on the main logic board. While the bat handles on the toggles are "full" sized, the actual toggle switch is using a "micro" body. If you wanted to move the switches to another panel, it's going to be really simple. I'd recommend desoldering the switch from the board and replacing the switch with either a 3 pin header (the spacing looks to be compatible with .100 pin spacing) or a 3 wire female servo lead which would be a better choice if in fact the spacing isn't .100.
If you're going to use the TPM in your GA cockpit, I would recommend thinking seriously about moving the guts to a new box - primarily to get the switches out of the box and moved elsewhere. If you do that, I'd recommend adding connectors to the pot leads so as to make it easier to move the main logic board around without stressing those - by installing either servo leads or 3 pin headers on the logic board (just like with the switches), you'll be able to move things around easily - you can also extend the leads if you need to.
I've taken a series of pictures that show the interior and how the unit is built.
If you remove the "-sm" suffix from the picture filename, you can view the full 3000x2008 resolution of the original picture.
Thanks all!
g.

-
Post Thanks / Like - 8 Thanks, 1 Likes, 0 Dislikes
 dgardner, jackwall, al3xfoster, Pfeil, Jordan Farmer, AK Mongo, Ronson2k9, Matt Olieman thanked for this post
 SimSupervisor liked this post
-
08-06-2011, 10:34 PM #2Executive Vice President, MyCockpit


- Join Date
- Oct 2005
- Location
- Ocala, FL USA
- Posts
- 2,883
Re: Saitek TPM teardown...
Good info Gene... Thanks
Matt Olieman
-
08-07-2011, 11:05 AM #3500+ This must be a daytime job
- Join Date
- Oct 2009
- Location
- Juneau, AK
- Posts
- 547
Re: Saitek TPM teardown...
Thanks for the review/hack guide!
I had no idea that unit had a "regulator" system.
Reidhttp://juneaucessnasim.blogspot.com
N58243 (virtual)- Low and Slow...
-
08-07-2011, 04:47 PM #4150+ Forum Groupie
- Join Date
- Apr 2008
- Location
- Graham, WA
- Posts
- 296
Re: Saitek TPM teardown...
Yeah, the regulator is actually good idea. Not only does it give a "real" feel to the linear movement of the control, it prevents you from getting a good head of steam up while pulling on it, leading to a much smaller chance of accidental damage. The regulator is found under the little round cap directly opposite the pot on each control rod assembly. Saitek really has their sh*t together these days, that's for sure.
g.
-
03-16-2013, 05:12 AM #5New Member
- Join Date
- Mar 2013
- Location
- Australia
- Posts
- 1
Re: Saitek TPM teardown...
Nice work, mate. I am about to dissect mine and put it in a custom panel for a Mooney Bravo. Interesting project as my electronics skills are not superb ( hey, I DO know how to solder!).
So far I found out that the switches function as one button and the standard config only emulates the press when the button is switched down. There is a thread on FSXTimes how to overcome that with som INI editing.
My question is, can these switches be replaced by a push button (preferably with a led when pressed as on)? I want to link them to my audio COMx, VORX, MRK. I also want to use one for parking brake. I will have lights on my Saitek BIP but it would be great to have illuminated buttons.
Thanks for the feedback. Vince
-
03-17-2013, 08:53 PM #6150+ Forum Groupie
- Join Date
- Apr 2008
- Location
- Graham, WA
- Posts
- 296
Re: Saitek TPM teardown...
I don't see any reason why you can't replace the toggles with pushbuttons, but understand that the TPM has no way to drive LEDs.
g.
-
03-18-2013, 06:00 PM #7Executive Assistant

- Join Date
- Jul 2007
- Location
- North,East England
- Posts
- 1,445
Re: Saitek TPM teardown...
This is good old true sim building at it's best.
Exploration!
-
04-14-2015, 10:45 PM #825+ Posting Member
- Join Date
- Jul 2014
- Location
- French Polynesia
- Posts
- 29
Re: Saitek TPM teardown...
Your old post is valuable, thanks.
I want to disassembly my TPM and to look like the C172, I will cut the right side (switch sides) to get only the TPM I was also thinking remove the propeller level but unsure if it's easy or not.
Did anyone here did removed the switch side by cutting the box...? Your help can be useful for me. Thanks.
I saw a video where someone did remove the the right side of the Saitek TPM and even replace the knobs with realistic ones: https://www.youtube.com/watch?v=Ri6eq2WaEs8My c172 project: Fsx blog
-
04-15-2015, 12:59 PM #925+ Posting Member
- Join Date
- Sep 2014
- Location
- United States
- Posts
- 49
Re: Saitek TPM teardown...
I had to take mine apart last December due to my entire simulator cockpit falling over and the TPM being smashed into the ground with about 50 pounds behind it. Long story! This incident stripped the nylon gears on the throttle. Since I don't use the prop pitch control, I swapped the gear with that one and my blue knob no longer works. I talked to Saitek about getting a replacement gear and while they had no way to provide me a new gear (only the factory in China has them) they did offer to replace my unit but wanted a receipt which I no longer had. So it is what it is, but I don't mind because my sim is modeled after the 172S which has no propeller control anyway.
-
04-20-2015, 04:48 PM #1025+ Posting Member
- Join Date
- Jul 2014
- Location
- French Polynesia
- Posts
- 29
Re: Saitek TPM teardown...
I cut in between Prop and mixture to have throttle and prop only then assign mixture control to prop level and swap the red for the knob. It is a risky task as my brand new TPM is under guarantee and will no more be. All went fine, working, more than happy, was easy.
On the real cessna 172 you don't need all these Saitek (Prop + switches) For the C182T prop will be fine.
P_20150423_144158.jpgMy c172 project: Fsx blog

 Reply With Quote

This radio panel is advertised on Ebay. Does anybody know if I can use it with fs2004 Win7? It...
flightsim radio panel usbc....