

Results 1 to 10 of 21
Thread: 1979 Mooney M20J - Phase 1
-
01-29-2009, 02:46 PM #1300+ Forum Addict


- Join Date
- Sep 2007
- Location
- Durham (The original!), England
- Posts
- 332
1979 Mooney M20J - Phase 1
Hey all,
Here is an update regarding my new GA pit project; The Mooney M20J, circa 1979 !
I went for GA firstly because I am exclusively flying GA in the sim at the moment - in the beautifully stunning ORBX FTX AU scenery, and secondly so I could concentrate on the areas that I need to get experience in - the woodworking, cutting, panel making, etc ..... rather than get caught up in simulating advanced systems.
Up to now, the Sim consists of:-
- Satiek Yoke
- Saitek Throttle
- CH Pedals
- GoFlight Radio / case
- GoFlight RP48 buttons (AP)
- GoFlight LGT
- Saitek Pro Switch Panel
- Running PM GA IFR (demo at present) on Client PC
- Running FSWidgets GMAP on Client PC
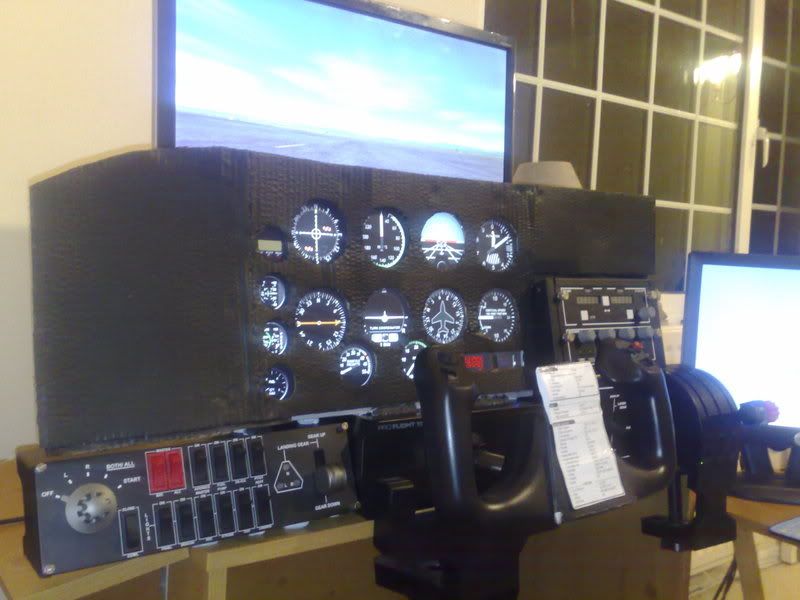
The 'MIP' is currently just a painted cardboard template - I have ordered some Plexi but I am nervous about cutting it as I have no experience and have little tools ...... so it will be a learning experience.
I am using the Carenado Mooney M20J FSX flight model.
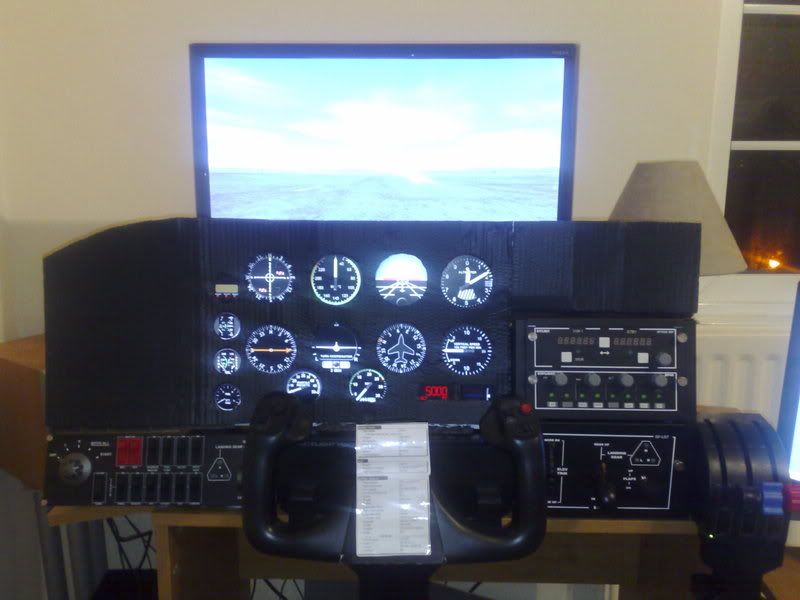
- Phase 2 will be the new MIP and replacement (better) pedals.
- Phase 3 will be an improved Yoke.
- Phase 4 will be Flight Illusion or Simkits gauges.
Thanks for looking !David R
Durham, England
1979 Mooney M20J Cockpit builder ......
-
Post Thanks / Like - 1 Thanks, 0 Likes, 0 Dislikes
 No Longer Active thanked for this post
-
01-29-2009, 06:03 PM #275+ Posting Member

- Join Date
- May 2008
- Location
- St Louis, MO, USA
- Posts
- 146
-
01-29-2009, 06:05 PM #3500+ This must be a daytime job


- Join Date
- Dec 2005
- Location
- MONTREAL
- Posts
- 930
Looks great, even with the cardboard
.
If you want to improve the look at very little cost while waiting for the real gauges:
Easier to work than Plexi, use an MDF panel 1/4"thick and cutout the holes with a drum blade on a drill.
Prime and sand a few times before painting. (Primed and painted MDF looks metal smooth.)
Find ABS or PVC pipe of the proper diameter and cut thin slices to make the rings around the gauges.
I did my first generic sim like that and it looked very nice.
 Jackpilot
B737-700 Posky
FS9/P.Magenta
without PMSystem
-
Post Thanks / Like - 1 Thanks, 0 Likes, 0 Dislikes
David Rogers thanked for this post
-
01-30-2009, 07:53 AM #4300+ Forum Addict
- Join Date
- Sep 2007
- Location
- Durham (The original!), England
- Posts
- 332
Thanks William - those gauges are only the PM demo at the moment, so I still need something more permanent. I admire you buiding your own gauges!
Jack - Thanks. You know what, I am beginning to wish I had just bought a 1/4 MDF panel now, rather than buying the plexi (which arrived 30 minutes ago!). I've have good exprience cutting MDF in the past and made my first generic airliner MIP out of MDF. (Although it didn't look anywhere near as realistic as yours does in the pic!).
I was wondering what I culd use to get some gauge bezels so thanks for the idea about the ABS or PVC piping. Looks fantastic in your pic !
I don't have a Hole Saw to cut the Plexi with, so I may have to just drill holes (through masking tape), and then file the rest of the hole out.
....or alternatively, I may just go and buy an MDF panel from the hardware shop that's 10 minutes away !
DavidDavid R
Durham, England
1979 Mooney M20J Cockpit builder ......
-
01-30-2009, 08:47 AM #51000+ Poster - Fantastic Contributor
- Join Date
- Nov 2008
- Location
- Europe
- Posts
- 1,934
Hi,
As for making gauges from cutting sections of plastic/pvc pipe, there are many junk alternatives......
Now dont laugh!.....but the standard bisto gravy tub (yes...ahhh bisto!) its a red tub and to my knowledge it is infact 79mm in diameter!!! (well it was the last time i checked) and its the exact same diameter as the simkits guages!!!
So, go and buy 10 tubs of gravy from tescos and pour gravy on everything you eat! or drink it...or give it to your cat! whatever, you need the tubs!
If you remove the plastic lid from the tub you also have a nice 'template' to draw your gauge holes ready to cut, once you have removed the lid you will find that the open end of the tub has a really nice finnish like smooth rounded edges, whatever you do dont buy tesco's own gravy (200g) because they only have 70mm diameter tubs!
Ok its real crazy me going on about gravy tubs on a sim forum, but its the sort of thing you throw away and dont realise what use it can have,
also have you thought about 'tin cans' you could go and find a 79mm or 80mm tin can, remove all the paper so you have a shiny finnish, so if you mount the tin can in your panel and and leave a 2-3mm section exposed out of the panel, you will infact find that you have created a really nice shiny polished 'trim' on your panels that has a professional finish! Also a tin can will give you a sturdy enclosure to create some gauges!
Believe me this is what im doing, its all about junk, and stuff you throw away, and with alot of thought and imagination you will be suprised just how good this will look! And you will be able to tell people that your panel is made from bisto gravy tubs and baked bean cans and people are like.....'no way???'
Something to think about!........Junk & Rubbish!
Mate go and raid you mums kitchen get the tape measure out and start measuring those tubs, tins and cans! and eat away!
Laughable i know, but what you got to lose.....only gain!
Alex
-
Post Thanks / Like - 1 Thanks, 0 Likes, 0 Dislikes
David Rogers thanked for this post
-
01-30-2009, 10:15 AM #6300+ Forum Addict
- Join Date
- Sep 2007
- Location
- Durham (The original!), England
- Posts
- 332
Hey actually, you've got some really good ideas there Alex! I know the exact plastic top to the gravy tubs that you mean and yes, primed and painted they would look good! Sometimes it's as much about imagination and resourcefulness as about getting expensive bits.

CheersDavid R
Durham, England
1979 Mooney M20J Cockpit builder ......
-
01-30-2009, 10:21 AM #7500+ This must be a daytime job
- Join Date
- Dec 2005
- Location
- MONTREAL
- Posts
- 930
Besides you can keep the plexi, if clear and thin, put it behind the MDF and presto you have lenses for your gauges.
Simkits used to sell vey nice bezels for small and big instruments..cant find them on their site but maybe a caall or an email.Jackpilot
B737-700 Posky
FS9/P.Magenta
without PMSystem
-
01-30-2009, 10:38 AM #82000+ Poster - Never Leaves the Sim

- Join Date
- Oct 2006
- Location
- Southern Illinois, USA
- Posts
- 2,887
That might not look quite right though. The glass should be flush with the bezel. With the bezel mounted to the MFD and the acrylic mounted behind the MFD, it's not going to look correct. Originally Posted by Jackpilot

The PVC pipe is great for round instruments. I have 2" rings painted and ready to go now for a year for my engine panel. The rest I had to cut from sheet stock because they aren't round.
If you decide to use the acrylic for the panel, find the finest toothed hole saw you can. The type used for fine woodworking. Fasten it tightly (but not overly tight) to the work surface and make certain you have a wood backer. Secure it as close to where you are drilling as possible. If it shifts or jumps it could crack the entire panel. A safer, but slower alternative is a coping saw.
If you change your plans and use the MFD for the panel instead, there are suppliers that sell pre-cut round plastic acrylic discs in assorted sizes. I bought a bunch of these to use for my 3" instruments on my panel. The hole in the bezel just needed some light sanding to get a tight friction fit with no adhesive.Boeing Skunk Works
Remember...140, 250, and REALLY FAST!
We don't need no stinkin' ETOPS!

Powered by FS9 & BOEING
-
01-30-2009, 10:43 AM #9500+ This must be a daytime job
- Join Date
- Dec 2005
- Location
- MONTREAL
- Posts
- 930
Agreed, but David was talking about a temporary set up....Round lenses are definitly better looking Originally Posted by Michael Carter
Jackpilot
B737-700 Posky
FS9/P.Magenta
without PMSystem
-
01-30-2009, 11:09 AM #102000+ Poster - Never Leaves the Sim
- Join Date
- Oct 2006
- Location
- Southern Illinois, USA
- Posts
- 2,887
Oops, I didn't read that part. Sorry.
Why temp though? Just go for it. You have a temporary panel now.Boeing Skunk Works
Remember...140, 250, and REALLY FAST!
We don't need no stinkin' ETOPS!
Powered by FS9 & BOEING

 Reply With Quote
Similar Threads
-
Mooney Bravo panel.
By Doon1 in forum My Cockpit UpdateReplies: 3Last Post: 03-07-2011, 12:52 PM -
Second build. Mooney Bravo
By Doon1 in forum General Aviation (GA) Builder DisccusionReplies: 0Last Post: 05-03-2010, 12:03 PM -
How about this 3 phase gearboxed motor?
By metalnwood in forum Cockpit Parts and Motion PlatformsReplies: 1Last Post: 03-22-2009, 08:09 PM -
Phase 1 737NG complete
By David Rogers in forum My Cockpit UpdateReplies: 9Last Post: 11-27-2007, 11:22 PM


Looking for fun companions for travels and adventures? Authentic Ladies Premier Сasual Dating
Top-notch Сasual Dating -...