

Results 11 to 20 of 28
Thread: Mounting Roberto's Yokes
-
12-26-2007, 01:46 AM #11MyCockpit Support Staff


- Join Date
- Oct 2005
- Location
- El Salvador
- Posts
- 930

[QUOTE=Westozy;47513]
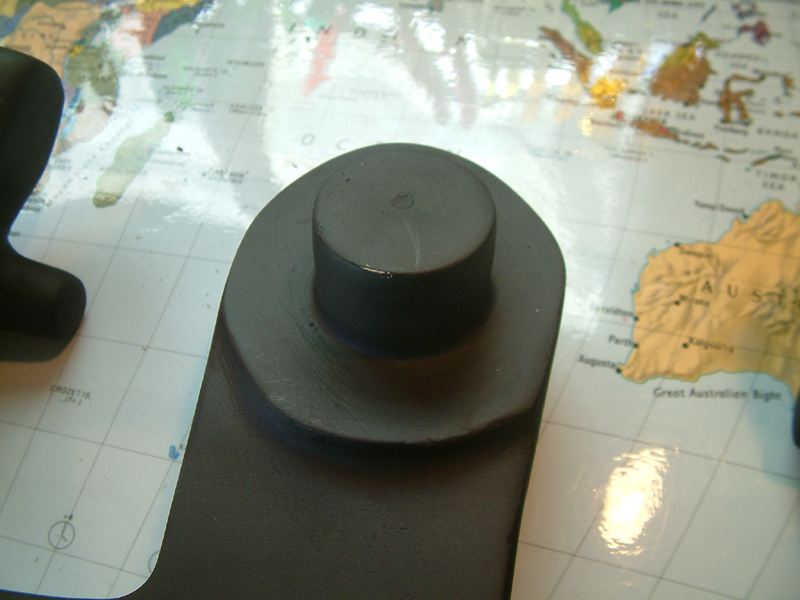
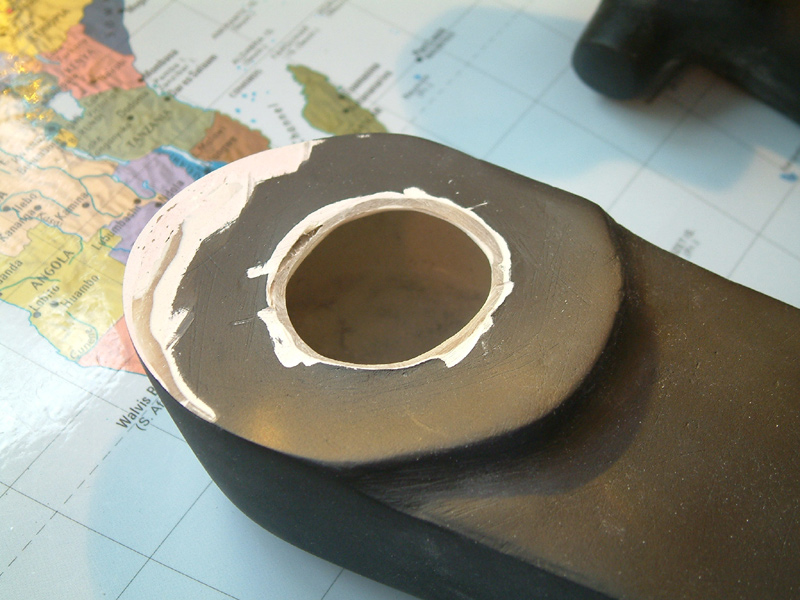
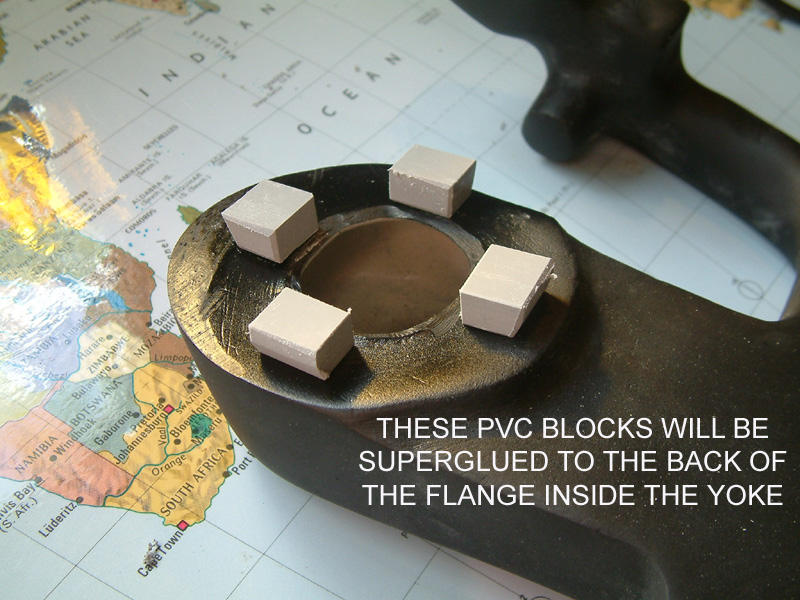
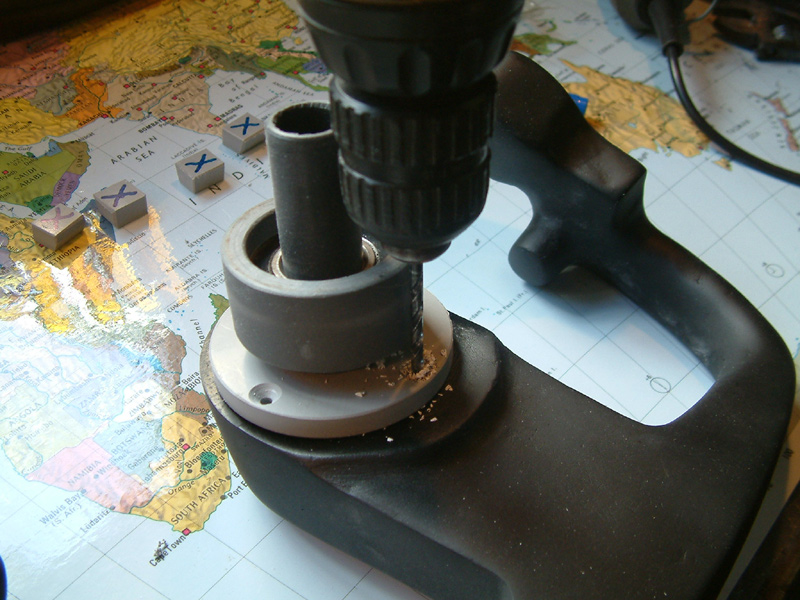
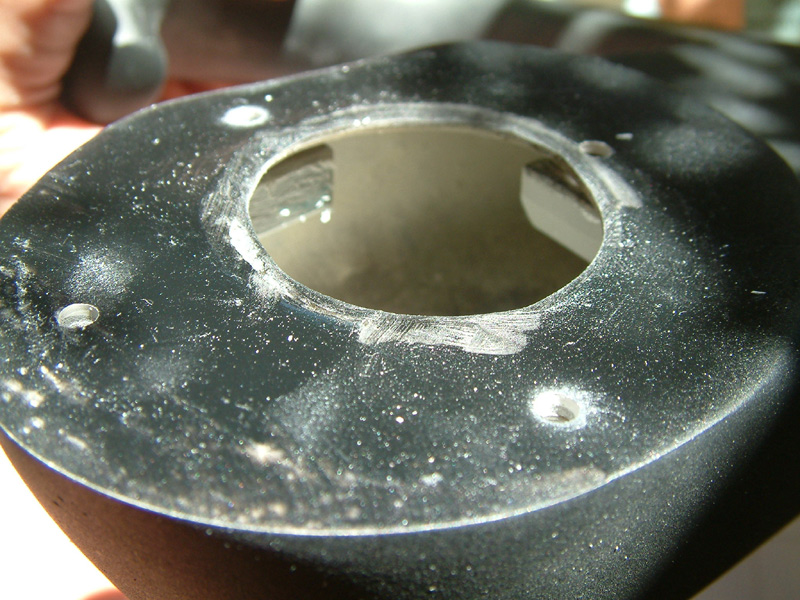
Roberto, the mounting area of the yoke is little difficult to work with as the fibreglass is quite thin. Is it possible to manufacture them with a timber ring installed at the back of the flange area to build up the thickness a little. I can see some builders are possibly going to have problems finding a way to mount them. I had to cut off the protruding section on the back of the yoke in order to have two flat surfaces to work with. I overcame this problem by glueing some thick waste plastic to the inside of the handle to reinforce the flange mount area. I drilled and tapped these reinforcements after the glue had set to take the four 3/16" bolts. Just a suggestion, I don't know what you had in mind as an idea for mounting them.
Thanks for the feedback I will probably make a Plastic ring CNC cut to place on the Back of the Yoke or I will ask the guy that molds them if he can make it thicker... I thought it was thicker on that part I actually specified on it!! As for the protounding section on the back actially that is from the original Yoke that part is where the mechanical Gear goes that connects the Yoke to the Stand itself so I cannot get rid of it but It can be made more solid!! My idea was to throw a nut all the way through the fornt of the Yoke to the back and then somehow attach it to the stand... Could you send me more detailed pictures of what you have done? Will make this second run thicker on the Back!
Thanks.
Roberto
-
12-26-2007, 05:03 AM #12MyCockpit Support Staff


- Join Date
- Nov 2005
- Location
- Perth, Western Australia
- Posts
- 1,415
[quote=dodiano;47529]
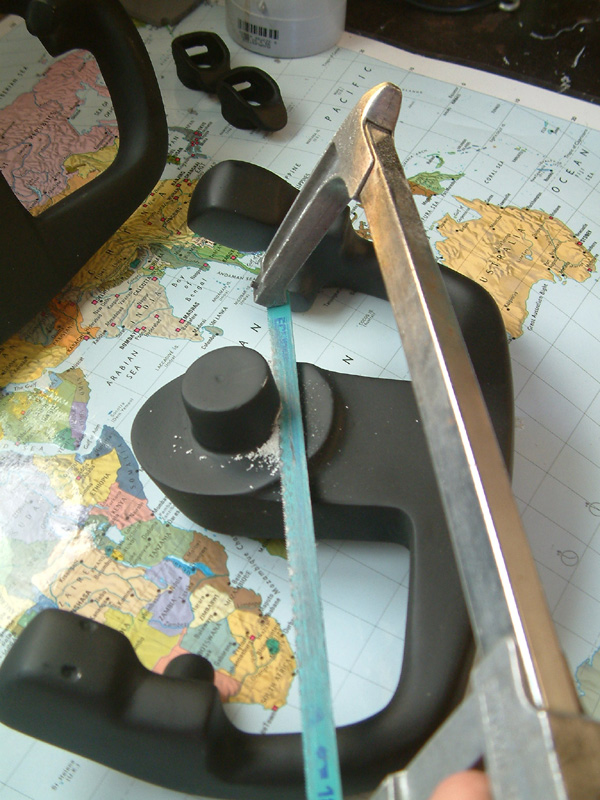
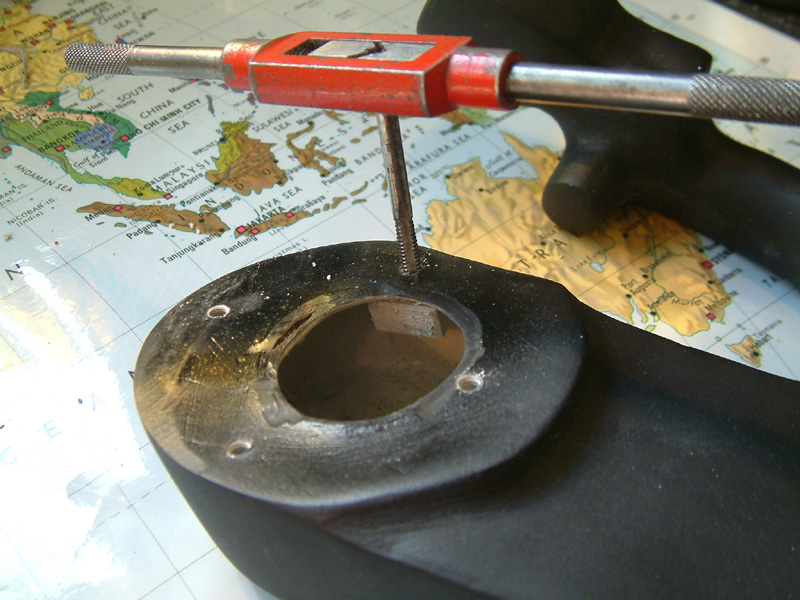
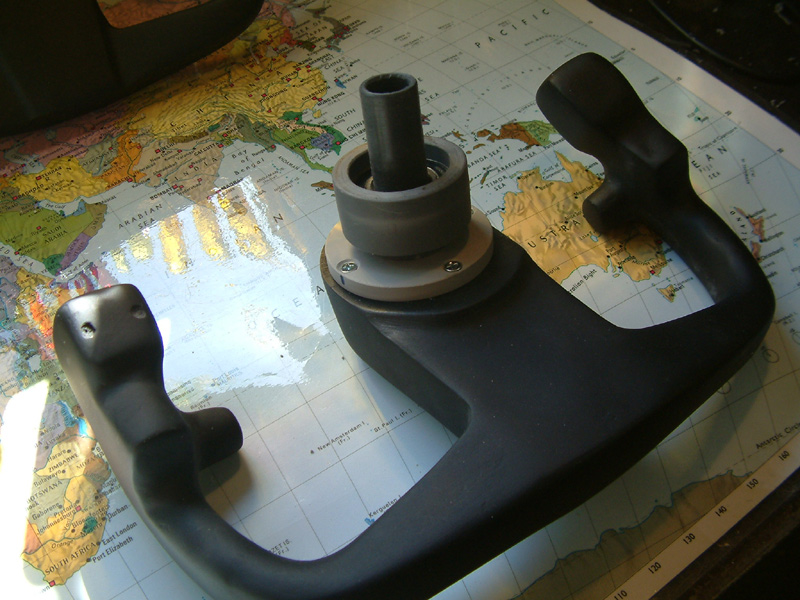
When I do the second one this week, I'll take pics of how I modify it to fit my flange. Some novices can be a bit heavy handed flying sims so I think a flange with a hollow axle is probably the strongest way to mount it, it feels quite sturdy. If the centre section was solid it could be drilled and fitted with a tube but that's a difficult drilling operation on a valueable piece of gear, it might break if the drill jammed. It was easy to cut off the protruding piece on the back of the yoke with a hacksaw and I cleaned up the sharp edges with the Dremel sander. This left a hole about 40mm in diameter, it should be easy to feed the wiring through. Originally Posted by Westozy

Gwyn
737NG using Prosim737, Immersive Calibration Pro, Aerosim Solutions motorized TQ & cockpit hardware, CP Flight MCP & FDS SYS1X, SYS2X & SYS4X, FDS PRO FMCs, AFDS units & Glarewings, Matrix Orbital ELEC display, Pokeys Landing & Cruise alt display, Buttkicker Gamers, 3 x BenqMW811ST projectors with a Matrox Th2Go
http://www.aerosimsolutions.com.au
Supporter of MyCockpit.org, please join me in donating!!!
-
12-26-2007, 09:46 AM #132000+ Poster - Never Leaves the Sim

- Join Date
- Oct 2006
- Location
- Southern Illinois, USA
- Posts
- 2,887
Nice work Gwyn.
Will you be using a shaft collar to hold the yoke to the column head?Boeing Skunk Works
Remember...140, 250, and REALLY FAST!
We don't need no stinkin' ETOPS!
Powered by FS9 & BOEING
-
12-26-2007, 11:45 AM #14MyCockpit Support Staff
- Join Date
- Nov 2005
- Location
- Perth, Western Australia
- Posts
- 1,415
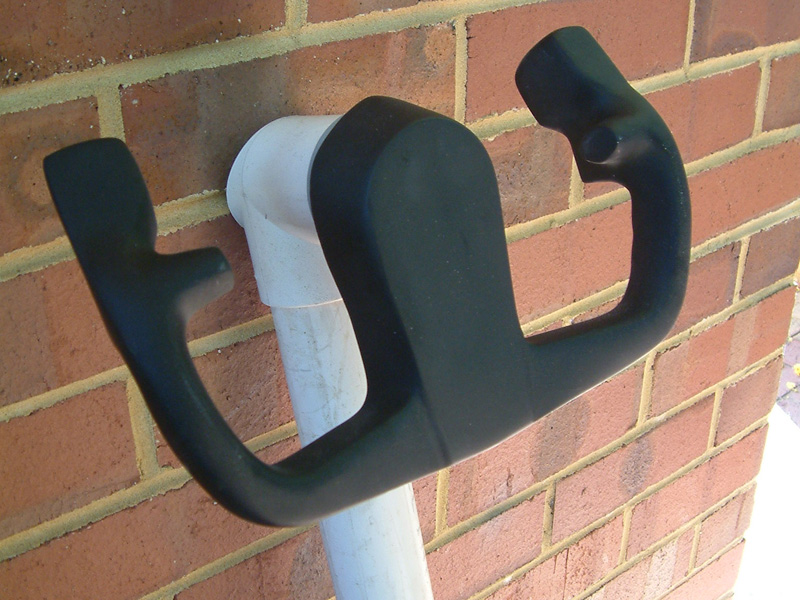
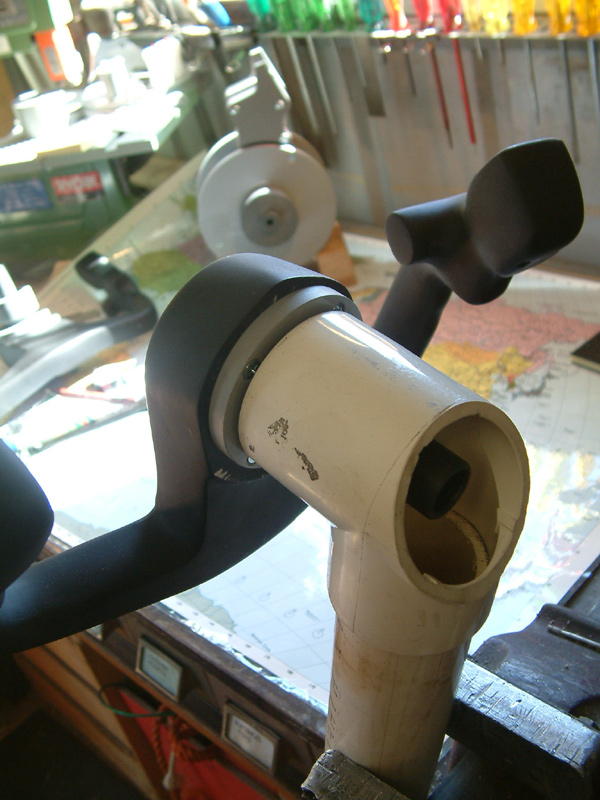
The cable drive pulley when made and fitted inside the elbow will more or less lock it all together but I've machined interference tolerances so it's all "push" fit, the parts fit together tight without glue or fasteners. There's no real load on these parts only the link cable tension which is not a great deal. The last pics show the handles firmly attached to the column heads, it works! More pics soon... Originally Posted by Boeing Skunk Works
Gwyn
737NG using Prosim737, Immersive Calibration Pro, Aerosim Solutions motorized TQ & cockpit hardware, CP Flight MCP & FDS SYS1X, SYS2X & SYS4X, FDS PRO FMCs, AFDS units & Glarewings, Matrix Orbital ELEC display, Pokeys Landing & Cruise alt display, Buttkicker Gamers, 3 x BenqMW811ST projectors with a Matrox Th2Go
http://www.aerosimsolutions.com.au
Supporter of MyCockpit.org, please join me in donating!!!
-
12-26-2007, 10:23 PM #15Executive Vice President, MyCockpit

- Join Date
- Oct 2005
- Location
- Ocala, FL USA
- Posts
- 2,884
 More Photo Updates From Westozy

-
12-26-2007, 10:31 PM #16MyCockpit Support Staff
- Join Date
- Nov 2005
- Location
- Perth, Western Australia
- Posts
- 1,415
Thanks for posting those pics Matt, could you please send me a small tute on how you do it? I have the new passwords etc, thanks. (No hurry!)
These 12 pics are also in my 2nd album with detailed descriptions here http://www.mycockpit.org/photopost/s...ry.php?cat=560
Gwyn
737NG using Prosim737, Immersive Calibration Pro, Aerosim Solutions motorized TQ & cockpit hardware, CP Flight MCP & FDS SYS1X, SYS2X & SYS4X, FDS PRO FMCs, AFDS units & Glarewings, Matrix Orbital ELEC display, Pokeys Landing & Cruise alt display, Buttkicker Gamers, 3 x BenqMW811ST projectors with a Matrox Th2Go
http://www.aerosimsolutions.com.au
Supporter of MyCockpit.org, please join me in donating!!!
-
12-26-2007, 11:12 PM #172000+ Poster - Never Leaves the Sim
- Join Date
- Oct 2006
- Location
- Southern Illinois, USA
- Posts
- 2,887
Thanks for the pics. That explains a lot. Nice work.
Boeing Skunk Works
Remember...140, 250, and REALLY FAST!
We don't need no stinkin' ETOPS!
Powered by FS9 & BOEING
-
12-26-2007, 11:51 PM #18MyCockpit Support Staff
- Join Date
- Oct 2005
- Location
- El Salvador
- Posts
- 930
Oh now I understand you!! Well actually that protuberance you cutted out is original from the 737 Yoke as I said before is where the Yoke is connected to the stand! Now I cannot cut it cause that is thick so that people could throw a tube or something in the Middle to hold it... That was my original idea... but your approach is beautiful I would never have thought about that approach!! Now my casting guy is working to see if we can replicate the Axle or gear that goes behind those 737 yokes and they could probably fit a real stand but it would be a trial basically nothing for sure cause I don´t have a stand Yet to try it out!! Amazing Approach Gwyn but is not how I thought it would be reason why the Back part of the Yoke is not that thick...But the protuberance is!!
Thanks for that Gwyn very inspiring I will have to come out with something to linked but then again my idea for these Yokes was to provide an approach for each builder... I want to try adapting it to a CH Yoke will have to buy one and try it out!!"
Regards,
Roberto
-
12-27-2007, 03:24 AM #19MyCockpit Support Staff
- Join Date
- Nov 2005
- Location
- Perth, Western Australia
- Posts
- 1,415
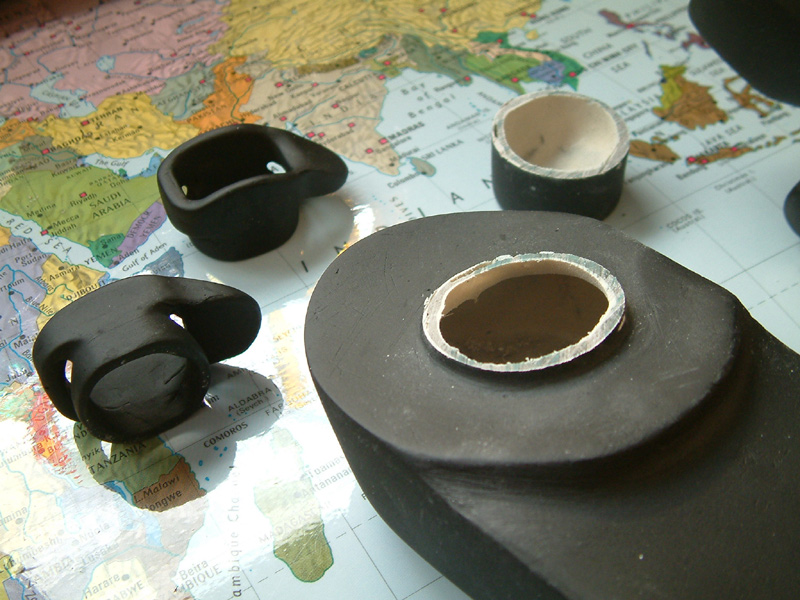
The cap pieces I cut off were still only 3 - 4mm thick and pretty much hollow, you can see it on the 4th pic down in the previous post. They would only support a tube if it was fixed at the front of the yoke aswel, like you said before it would need to have the front face drilled. That would be a shame to spoil it although a checklist plate could cover it. With a flange fit you can consider any type of adaptation to any size of axle really. Originally Posted by dodiano
I'll probably fit the switches tomorrow and take some more pics.
Gwyn
737NG using Prosim737, Immersive Calibration Pro, Aerosim Solutions motorized TQ & cockpit hardware, CP Flight MCP & FDS SYS1X, SYS2X & SYS4X, FDS PRO FMCs, AFDS units & Glarewings, Matrix Orbital ELEC display, Pokeys Landing & Cruise alt display, Buttkicker Gamers, 3 x BenqMW811ST projectors with a Matrox Th2Go
http://www.aerosimsolutions.com.au
Supporter of MyCockpit.org, please join me in donating!!!
-
12-29-2007, 04:50 AM #20MyCockpit Support Staff
- Join Date
- Nov 2005
- Location
- Perth, Western Australia
- Posts
- 1,415
Fitting the switches
Hi all,
I fitted all the switches and wiring to one yoke today and I've posted all the pics so far on my website like a pictorial tute.
http://aerosimsolutions.googlepages.com/yokebuild
Gwyn
737NG using Prosim737, Immersive Calibration Pro, Aerosim Solutions motorized TQ & cockpit hardware, CP Flight MCP & FDS SYS1X, SYS2X & SYS4X, FDS PRO FMCs, AFDS units & Glarewings, Matrix Orbital ELEC display, Pokeys Landing & Cruise alt display, Buttkicker Gamers, 3 x BenqMW811ST projectors with a Matrox Th2Go
http://www.aerosimsolutions.com.au
Supporter of MyCockpit.org, please join me in donating!!!

 Reply With Quote
Similar Threads
-
Mounting Korry and Jay-El switches to Panel
By Atomic_Sheep in forum Cockpit Parts and Motion PlatformsReplies: 12Last Post: 12-02-2011, 10:17 AM -
Mounting FI insruments in Poldragonet M.I.P.
By davemckee in forum General Builder Questions All Aircraft TypesReplies: 0Last Post: 03-12-2010, 02:59 PM -
Double set with CH yokes&pedals causes yokes to spike
By MortenHa in forum General Builder Questions All Aircraft TypesReplies: 3Last Post: 01-29-2010, 12:44 PM


Free connections, find your partner with no obligations Real-life Girls Exemplary Сasual Dating
Super Сasual Dating - Verified...